Ready to give your nails a Valentine's Day makeover? This guide is your all-access pass to creating stunning nail art, regardless of your skill level. We'll explore the hottest 2024 trends – from classic reds and pinks to playful conversation hearts and dazzling glitter – and show you exactly how to recreate them at home. Whether you're using a DIY kit or visiting a salon, we've got the tips and tricks to help you achieve amazing results. Let's get started and make your nails the star of the show this Valentine's Day!
Classic Romance: Reimagined Red & Pink
Red and pink remain the ultimate Valentine's Day classics, but let's ditch the predictable! This year, we're elevating these timeless hues with sophisticated twists. Imagine a deep crimson base, subtly accented with delicate gold foil for a luxurious touch. Or perhaps a soft blush pink adorned with tiny, meticulously placed heart accents – adorable and effortlessly chic. Feeling adventurous? Try a stunning ombre effect, seamlessly blending fiery red into a gentle rose pink for a gradient as romantic as it is unique. Are you ready to give your nails a touch of timeless elegance?
Step-by-Step Instructions:
- Prep Time: Gently push back your cuticles and buff your nails for a smooth surface. This ensures better polish adhesion and a longer-lasting manicure.
- Base Coat: Apply a thin coat of your favorite base coat. This protects your nails and prevents staining. Let it dry completely.
- Color Splash: Apply two even coats of your chosen red and/or pink shades. For the ombre, apply one color to half the nail, the other to the other half, and then gently blend where they meet with a small sponge or brush. If using gel polish, remember to cure each layer under a UV/LED lamp.
- Finishing Touches: Add those delicate gold foil accents or tiny hearts using specialized nail art tools or easy-to-use stickers. Experiment with placement—a single heart on your ring finger, or a delicate scattering across all your nails.
- Seal the Deal: Finish with a glossy top coat to protect your masterpiece and add a beautiful shine!
Pro Tip: Thin coats of polish and allowing each layer to dry fully prevent smudging and ensure an even application.
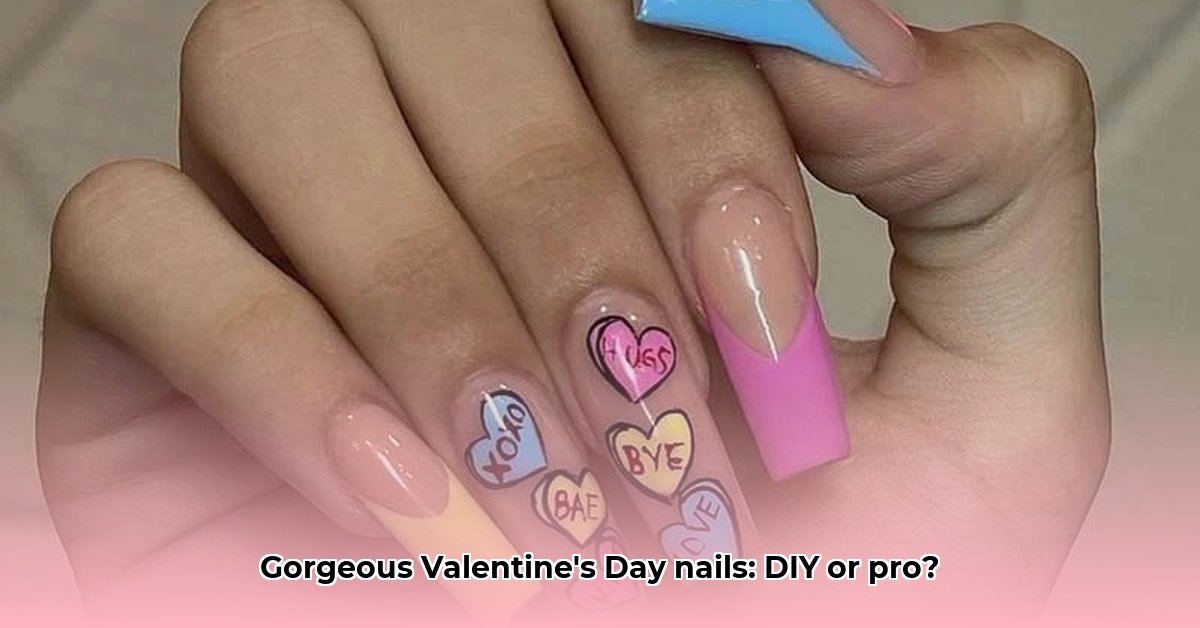
Playful Hearts & Sweet Sayings: Whimsical Designs
This Valentine's Day, let's embrace our playful side! Conversation hearts are trending big time—think of those sugary treats, but on your nails! Picture a pastel pink canvas sprinkled with adorable conversation hearts, each one a tiny burst of sugary sweetness. Or, for a more minimalist approach, feature a single accent nail with a cute cartoon heart, adding a touch of quirky charm. Given the popularity of playful nail art, what's your favorite way to incorporate fun designs?
Step-by-Step Instructions:
- Choose Your Base: Start with a light, cheerful base coat. Pale pink, creamy white, or even a soft mint green will make your conversation heart decals really pop.
- Decal Delight: Carefully apply your conversation heart decals to your nails. You can find an amazing variety online or at your local beauty supply store. Take your time; precision is key!
- Shine Time: Finish with a protective top coat. Feeling extra festive? Add a layer of clear glitter for a touch of extra sparkle—perfect for capturing the light and adding a playful dimension.
Glittery Glam: Shimmer and Shine All Day Long
Want some serious sparkle? Glitter is a guaranteed way to elevate any Valentine's Day manicure. Whether you prefer a subtle shimmer or an all-out glitter explosion, the options are endless! Imagine a classic red base coat, transformed into a mesmerizing, shimmery red with the addition of fine red glitter. Or, try adding holographic glitter to your pink nails for a touch of playful magic. Considering the enduring appeal of glitter, what are your favorite glitter colors for Valentine's Day?
Step-by-Step Instructions:
- Base Coat Magic: Start with your favorite base color.
- Glitter Application: While the base coat is still slightly tacky (but not wet), generously apply your glitter.
- Excess Removal: Carefully tap off any excess glitter using a small brush to remove stray pieces.
- Top Coat Protection: Seal the deal with a top coat to keep those glittery bits firmly in place, adding shine and durability to your manicure.
Heart French Manicure: A Modern Twist on a Classic
The French manicure is getting a very romantic makeover! Instead of the classic white tip, we're adding a touch of Valentine's Day flair with a heart-shaped tip. This is a fun way to add a touch of romance without being overly loud. Red, pink, or even a bold burgundy would look stunning. Given the resurgence of classic nail art styles, how would you personalize a French manicure?
Step-by-Step Instructions:
- Base Coat Selection: Apply a neutral base coat—a soft beige or nude shade is perfect.
- Heart Template: Use nail art tape to create a heart shape at the tip of each nail. Take your time ensuring nice, clean lines.
- Color Pop: Paint the heart shape with the color of your choice.
- Tape Removal: Carefully remove the tape to reveal your perfectly shaped heart tips.
- Finishing Touch: Finish with a protective top coat.
Choosing Your Perfect Valentine's Day Mani
The best Valentine's Day nail set depends entirely on your personal style and how much time you're willing to dedicate. Want something quick and easy? A solid color or a simple accent nail is a perfect choice. For those feeling adventurous, there are plenty of more complex designs to explore. Ultimately, the perfect manicure should reflect your unique personality and style.
DIY vs. Professional: Weighing Your Options
Sometimes, deciding between a DIY manicure and a professional appointment comes down to a few key factors. Consider the pros and cons to find what works best for you this Valentine's Day.
| Feature | DIY | Professional Manicure |
|---|---|---|
| Cost | Lower | Higher |
| Time Commitment | Varies; can be quite time-consuming | Shorter – usually less than an hour |
| Skill Level | Requires some practice and the right tools | No prior experience needed |
| Customization | Highly customizable | Highly customizable, but within salon limitations |
| Product Availability | You'll need your own polishes and tools | All products are included |
Remember, the most important thing is to have fun and create a manicure that makes you feel confident and beautiful. Happy Valentine's Day!
💅 https://maniology.com/blogs/maniology-blog/simple-valentines-day-nails